| 1. Vamos precisar de 12 quadrados de papel da mesma cor. Convém que não seja muito fino. Papel de fotocópia serve.
|
| 2. Começar por dobrar o quadrado a meio segundo as duas diagonais. Virar.
|
| 3. Do outro lado, dobrar a meio segundo os eixos horizontal e vertical.
|
| 4. Fechar o modelo. Aqui visto por cima.
|
5. O modelo depois de fechado fica com este aspecto, com duas abas para cada lado.
montagem do modelo
|
6. Pegar numa das abas e enrolá-la em cone no sentido dos ponteiros do relógio.
|
7. Repetir nas outras três abas. Os enrolamentos devem ser todos na mesma direcção. Módulo terminado. Vista lateral.
|
8. Visto por cima. Agora é fazer as outras onze unidades.
|
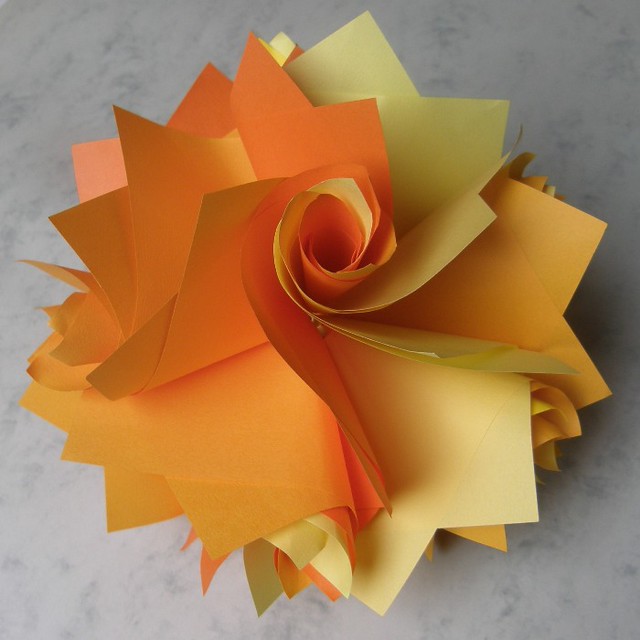
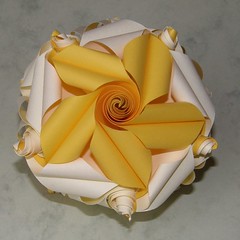
9. Aqui temos as doze unidades prontas a encaixar.
|
10. Para encaixar duas unidades, basta abrir um pouco uma das abas e enrolá-la juntamente com uma das abas da outra unidade, como podem ver na imagem acima.
|
11. Podemos juntar três unidades tomando uma aba de cada uma delas e enrolá-las juntas, formando o que podemos chamar um triangulo.
|
12. Da mesma forma, podemos juntar quatro e formar um quadrado.
|
13. Para a construção do modelo, começar por juntar as doze unidades em quatro triangulos como descrito em 11.
|
14. Para juntar dois triangulos um ao outro, basta enrolar juntas as duas abas laterais de um triangulo com duas abas laterais do outro, para formar umquadrado. Depois enrolam-se juntas as abas soltas dos vértices de um lado e do outro. ◄ver nota
|
15. A junção do terceiro triangulo é feita da mesma forma, formando um novoquadrado. A aba solta de um dos vértices forma também um novo triangulo. E assim sucessivamente, juntando as laterais (2 + 2) para fazer quadrados e as abas dos vértices (1+1+1) para fazertriangulos.
|
16. Este é o aspecto do modelo com três triangulos visto por baixo. Com a junção do quarto triangulo, o modelo ganha bastante elasticidade e vai abrindo conforme vamos colocando as abas nos pontos de enrolamento. Se alguma das abas se soltar, voltar a enrolá-la e apertar um pouco.
|


 IP卡
IP卡 狗仔卡
狗仔卡 发表于 2012-1-15 13:41:44
 提升卡
提升卡 置顶卡
置顶卡 沉默卡
沉默卡 喧嚣卡
喧嚣卡 变色卡
变色卡 千斤顶
千斤顶 显身卡
显身卡
 楼主
楼主


 To assemble the units, gently ease one curl inside another curl. You can combine 2, 3, 4, 5... curls this way to create many-armed vortexes. You can think of a 3-vortex as a triangle, a 4-vortex is a square and so on. Combining the curls of a number of these units into vortexes you can make several different polyhedra.
 Continue building the cuboctahedron until you run out of units. Take care never to put more than one curl of a unit in the same vortex. If you lose track of the curls, just remember that each square is surrounded by 4 triangles and each triangle is
  surrounded by 3 squares.
 First you join 3 units in a sub-assembly (which we simplify to a "curly triangle") and then join 4 of these sub-assemblies as indicated in the big drawing on the right. The arrows and numbers indicate how many curls are joined at each position.
 To make the icosahedron (which has 5 faces meeting at each corner) we just leave a hole where the 5th face should go. As it's quite tricky to assemble, here's another diagram to help you. You use the same 4 sub-assemblies as for the cuboctahedron, but put them Figure 1 together in a slightly different way. The resulting figure is strangely irregular : it looks a bit like an icosahedron but not quite. The "holes" are pulled further apart than the "filled" triangular faces so the modular only has tetrahedral symmetry (and is in fact closely related to the snub tetrahedron).Here you see a strange property of these assemblies : the curls act as tiny rubber bands pulling the units together, so that the structure settles at an equilibrium position where the tension in all the curls is minimal (which is usually, but not always, quite a regular configuration).For the adventurous : A 4-unit tetrahedron is just possible. 3 curls of each unit are joined in 2-vortexes along the tetrahedron's edges, the fourth is unconnected. Or try the 18-unit deltoidal icositetrahedron. All curls are joined in 3-vortexes and those corners of the icositetrahedron where 3 faces meet are left as holes. That's why we only need 18 units instead of 26. Make a 24-unit snub cube, either leaving the 6 square faces as holes or leaving 8 triangular faces as holes (choose those triangles not sharing any edges with the squares)
 I haven't experimented with colours : I prefer working in white as the shadows on the curved surfaces show up better. If you want to have a go you could try folding your waterbomb bases from pre-coloured squares with a light-dark pattern as shown in the figures on the right. The cuboctahedron will then have triangular vortexes in one colour and square vortexes in the other (this works for the icosidodecahedron as well). If you don't like using pre-printed patterns, get duo paper, blintz it and then fold the blintzed triangles to create the colour pattern you want to experiment with.


 37032302000141
